How to Effectively Use a Stud Finder for Perfect Wall Installations in 2025
Using a stud finder is an essential skill for any DIY enthusiast and professional contractor looking to achieve precise installations. Whether you’re hanging shelves, mounting TVs, or securing cabinets, knowing how to effectively use a stud finder can greatly enhance your success. This guide dives into the best stud finder tips, techniques for stud detection, and how to choose the right tool for your projects ensuring perfect stud placement every time.
Understanding Stud Finders: What They Are and How They Work
A stud finder is a device designed to locate the wooden or metal studs within walls, which are crucial for securely attaching fixtures and furniture. Understanding the types and workings of stud finders is foundational for anyone seeking to master DIY projects. There are primarily two types: magnetic and electronic stud finders. **Magnetic stud finders** locate screws and nails within the wall, while **electronic stud finders** detect changes in density and can indicate exactly where the studs are located. With the ability to pinpoint studs behind drywall accurately, using a stud finder simplifies various home improvement tasks and enhances your overall success rate.
Types of Stud Finders Explained
When deciding **how to use a stud finder**, it’s essential to understand the different types available. **Magnetic stud finders**, for example, are often simpler and more budget-friendly, detecting fasteners in walls rather than the studs themselves. They are best suited for quick tasks where precision isn’t critical. On the other hand, **electronic stud finders** utilize advanced technology to offer more precise readings and often come with additional features like depth settings and alerts. If you need high accuracy, investing in a reliable electronic stud finder is a best practice that pays off in the long run.
Core Features to Look for in a Stud Finder
When choosing a stud finder, it’s important to consider important features such as detection depth, the ability to identify live wires, and the user interface. Stud finders with **easy-to-read LCD displays** often provide a clearer indication of stud locations, while those capable of detecting both wooden and metal studs are more versatile. Certain models come equipped with software for calibration and settings management, allowing for greater **stud finder accuracy**. Look for units that provide clear visual and audio feedback during operation, making the stud finding process more intuitive.
How to Properly Use Your Stud Finder
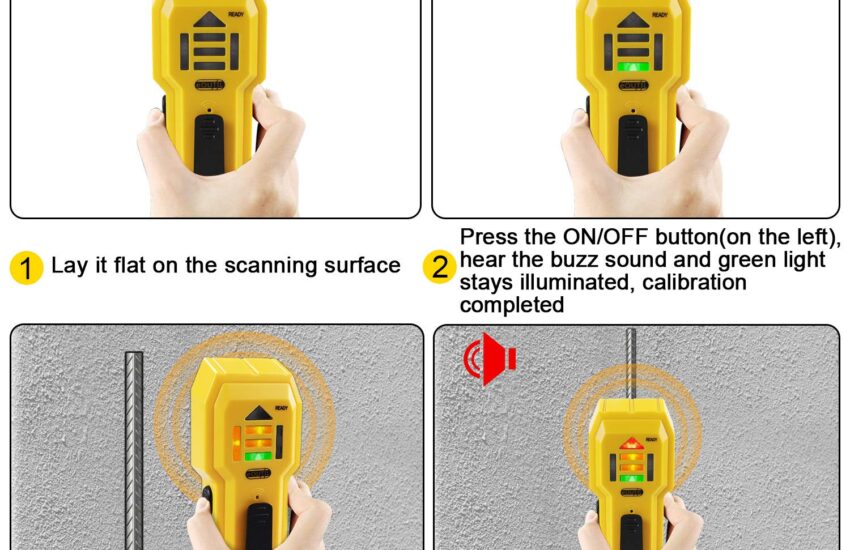
To maximize the effectiveness of your stud finder, proper usage is key. Always begin by **calibrating your device** according to the manufacturer’s instructions, usually done by placing it against the wall and activating it. For electric models, perform the scans slowly in horizontal sweeps across the intended area. Make marks where the stud finder indicates a presence; typically, a stud finder will alert you with lights or sounds when a stud is detected. Afterwards, confirm by tapping the wall, listening for a hollow sound, which indicates you’ve located studs behind drywall accurately.
Best Practices for Effective Stud Finding
Gaining proficiency in using a stud finder doesn’t rely solely on the device—it’s also about technique. A great tip for avoiding common stud finder mistakes is to understand the **sturdiness of wall materials**. For instance, drywall marks the stud location differently than tile or plaster. Sometimes advanced scanning methods or manual stud finding techniques, such as measuring from a corner or outlet—where studs are often placed 16 or 24 inches apart—can complement electronic models. Understanding these details will enhance your ability to achieve reliable stud finding results.
Tips for Quick Stud Detection
For quicker detection, try utilizing **stud finder placement** strategically. Begin near known fixtures and then work your way outward when searching for new studs. Use a measuring tape to mark increments on the wall as you scan—this is highly useful for wider wall spans. Remember to also check twice in different areas to verify stud accuracy—relying solely on initial findings can lead to errors during installations.
Common Troubleshooting for Stud Finder Use
If your stud finder isn’t operating as expected, don’t fret. Many common issues arise that can hinder performance, such as battery life or improper calibration. First, check to ensure you’ve installed new batteries and that the device’s sensors are clean from dust or wall particles. If you find the finder is consistently misidentifying the location, recalibrate it, ensuring it’s flat against the wall before starting. Also, remember that magnetic studs may require more than one sweep to detect multiple fasteners accurately.
Real-World Applications of Stud Finders
Understanding how to use a stud finder goes beyond simply locating studs. In the realm of DIY home projects, whether you’re installing shelves, securing artwork, or mounting a television, deploying effective stud detection strategies can prevent accidental damage to electrical wires or plumbing hidden within walls. Different materials require different installation approaches, and knowing the specifics can enhance your home improvement confidence.
DIY Projects: Enhancing Your Skills with a Stud Finder
Many DIY projects can greatly benefit from effective stud finding techniques. One classic example is installing shelves that can hold substantial weight; locating studs securely offers stability and support. Use **stud finder instructions** to mark the best spots for shelf brackets, ensuring strong support. Additionally, practices such as wall mounting televisions can maximize space while ensuring safety and security from accidental falls.
Future Trends in Stud Finding Technology
The advent of smart home technologies is impacting all areas of home improvement, including stud finding. Anticipate future models that could integrate with other smart devices for higher functionality—providing insights on wall types or integrating measurements into your home improvements digitally. Stay attuned to advancements in stud finder technology to get ahead of the curve and maximize your project efficiency.
Key Takeaways
- Understanding the types and function of stud finders informs better tool selection and usage strategies.
- Calibrating and placing your stud finder correctly enhances accuracy and saves time.
- Utilizing stud finder features effectively can improve your DIY outcomes significantly.
- Future advancements may combine stud finding with smart technologies for integrated home improvement solutions.
FAQ
1. How do I know which stud finder is best for my needs?
Choosing the best stud finder depends on the specific projects you plan to undertake. If you frequently work with various wall types and weights, an electronic stud finder may offer the versatility and features required. Review **stud finder comparisons** and consider the features that align with your needs, like **live wire detection** or LCD displays for clarity.
2. Can I find studs without a stud finder?
Yes, you can locate studs without using a stud finder by employing manual stud finding techniques. One popular method involves knocking gently on the wall; a hollow sound indicates no stud behind whereas a solid sound indicates a stud presence. You can also measure from electrical outlets, as studs are often placed 16 or 24 inches apart.
3. Are there safety tips I should follow while using a stud finder?
Absolutely! Always assess the area for electrical wires before installing into walls—to avoid any accidents. Moreover, while using electronic stud finders, maintain steady pressure during scanning, ensuring accurate readings and reducing the risk of damage to behind-wall installations.
4. What are some common mistakes made while using a stud finder?
Users often misplace their stud finder too far from intended locations or fail to calibrate correctly, leading to faulty results. Rushing through scans without verifying identified locations can lead to improper installations. Always confirm your findings and give your tool time to provide an accurate read.
5. What are the advantages of using a digital stud finder?
Digital stud finders offer several advantages over their manual counterparts; they typically provide more accurate readings and can differentiate between wooden and metal studs while sometimes identifying hidden wires. Enhanced displays and audio signals can help streamline the stud finding process, making installations safer and more efficient.
6. How often should I calibrate my stud finder for optimal performance?
Calibration should ideally be performed before each use, especially if you notice inconsistent readings. Regularly calibrating your device ensures accuracy and prolongs its functional life. Refer to your specific model’s manual for detailed calibration instructions to ensure precise operation.